Puck Recovery On Rim
Retrieving a puck off a rim is not an easy job and is not a job that a lot of players enjoyed. But the board work is such a crucial part of the game right now that you have to craft every day.
For this blog, we will look at 5 key points you need to focus on and don't need a coach to be next to you telling you what to do technically. The purpose behind this idea is for you to master the key points and make them habits, for both coaches and players.
In this video, we will see in the same situation, 5 seconds apart, a recovery by a defenceman and by a forward off the breakout. Notice that both don't have the same level of pressure and are not making the same play. Both applied most of the key points and moved the puck toward the offensive zone. Next time you are watching an NHL game, try to count how many times in a game players receive a pass or retrieve a puck off a rim. It could be at equal strength, on the power play, or during penalty killing.
Five key points when teaching this technique are:
- Scan the ice
- Body position
- Shield the puck
- Push off the wall
- Move the puck
Below, I’ve outlined four drills that you can use to help your players work on puck recovery along the boards. All drills can be found in the CoachThem Marketplace so you can easily add them to your personal playbook.
DRILL VIDEOS: Click on drill below to view video!
The below Practice Plan can be found in our Marketplace under Puck Recovery On Rim.
1. Puck Recovery On Rim - Getting Off The Wall

- F1 rim to F2.
- F2 uses skate and body position as a shield. Push off with the wall from the pressure.
- F3 (C) cuts inside and receives the puck.
- F4 times himself and receives the drop pass from F3.
2. Puck Recovery On Rim - Going Down On Rim And Up

- F1 rims the puck.
- RW goes through the puck, engages a tight turn on the catch, then goes up and BO.
- RW feeds F2, who receives pressure from F1 and goes for a shot.
3. Puck Recovery On Rim - Push Off With The Wall

- F1 rim to F2.
- F2 uses skate and body position as a shield. Push off with the wall from the pressure.
- F3 receives the puck and shoots.
- F4 blocks F2 and then goes for a moving screen.
4. Puck Recovery On Rim - Catching And Shooting
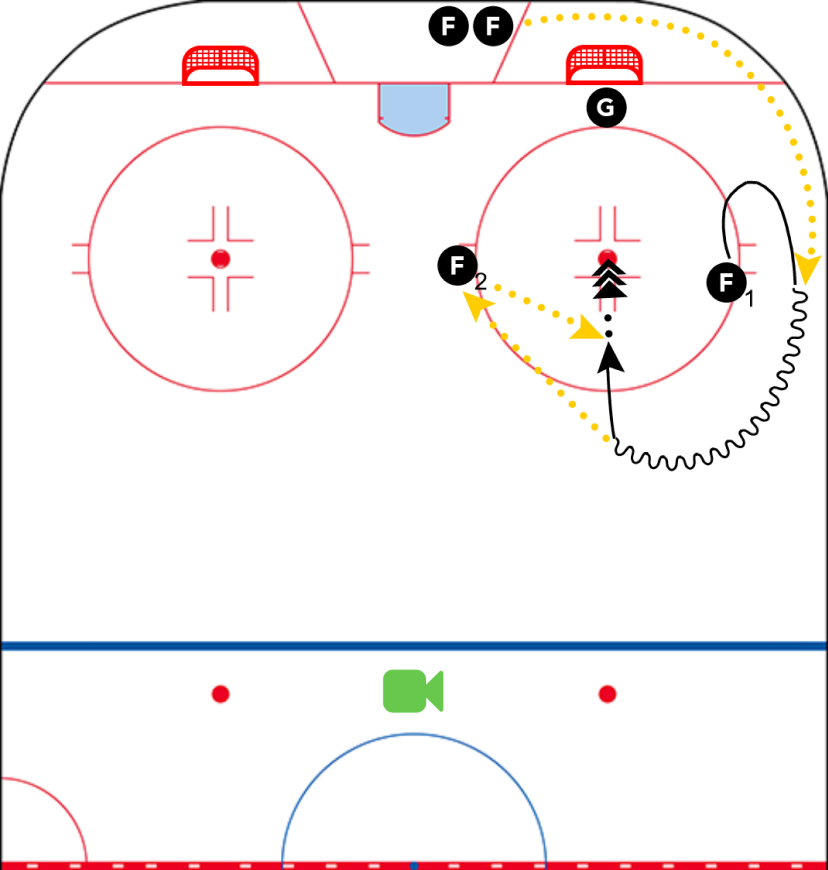
- F1 receives a rim from the low player. Could time himself.
- Working on forehand to backhand. Going up.
- F2 receives a pass and gives it back to F1 for a quick shot.
Blog by CoachThem Contributor, Mitch Giguere
Mitch Giguere, ChPC, an assistant coach with the Wheeling Nailers in the ECHL, affiliated with the Pittsburgh Penguins and Wilkes-Barre/Scranton Penguins. Mitch has his High Performance 2 from Hockey Canada, Advanced Coaching Diploma from the Canadian Sport Institute and is finishing his Learning Accelerator at the Canadian Sport Institute. You can follow his popular video breakdown on Social Media for more excellent hockey content.

Ditch the pen and paper! Sign up or log in to create professional digital drills in minutes.
Join CoachThem Rewards to earn money by referring other coaches and growing our coaching community!